A guide to newborn editing
In my last article, I spoke of the four elements that we should focus on to achieve a beautiful image 'in camera’. The next step is to polish these images in the editing process.
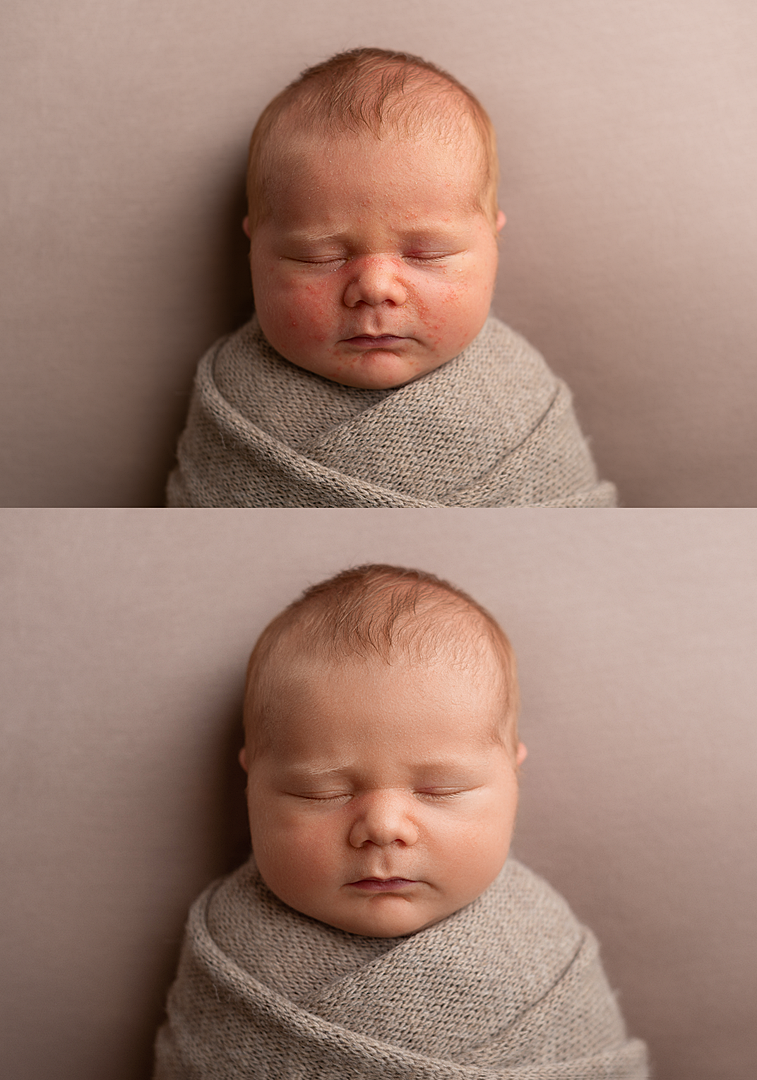
Newborn babies offer a whole range of challenges when it comes to retouching. These include baby acne, dry skin, blotchiness, redness and jaundice.
It is essential to have a good understanding of your editing software and the processes and techniques needed to overcome these challenges.
Here are a few tips to help keep the editing processing time down to a minimum and ensure perfect results:
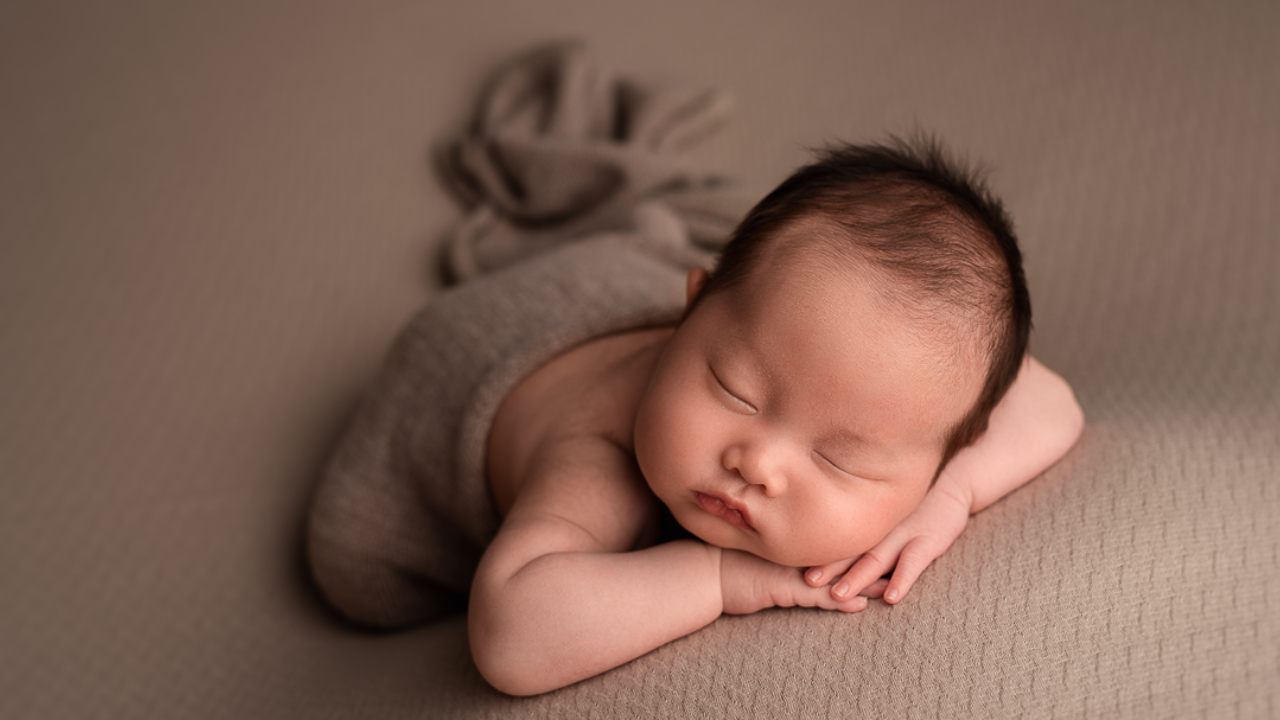
1: GET IT RIGHT IN CAMERA
It is vital to remember that we use photo editing software such as Photoshop to polish an already well-lit, nicely composed and correctly exposed image into an exceptional one, not to try and convert a poor image into something half decent!
To save time in Photoshop and ensure a pleasing result, a good ‘in camera’ image should:
- Be in focus
- Be well composed
- Have a great camera angle and perspective
- Have excellent attention to detail (fix the blanket creases, straight hair bands etc.)
- Be well lit
You can find out more about getting it right in camera, in this free resource
2: KNOW YOUR TOOLS
Photoshop is the most popular tool of choice for skin retouching and is used to enhance an image.
If you are entirely new to Photoshop, enrolling in a Photoshop course to understand the basics is a good idea.
Photoshop is incredibly powerful, and at first, it can be very daunting. Don’t stress! The good news is that we do not need advanced or complicated techniques. After an introductory course for beginners, and a few days of practice, you can tackle most scenarios.
3: GET THE COLOUR RIGHT
Our computer monitors' colours are not always those our camera created.
It is essential to calibrate (colour correct) your monitor to ensure we accurately represent the baby’s skin colour. You can use devices to calibrate your monitor to get accurate colours.
A calibrated monitor will result in a perfect print later on. If you have the budget, you can buy a professional retouching monitor to display the full gamut of colours your camera captures. These can also often self-calibrate, they are AMAZING, but they are also costly.

Remember, if your monitor’s colour is inaccurate, you will have a great-looking image on the screen, but the colours will be different when printing the image.
4: CONSISTENCY
Always try to work on the same monitor and in the same lighting conditions. If the light in the room you are editing is inconsistent, you will get inconsistent colour and exposure from one gallery to the next. For instance, if the room is too bright, you will overcompensate by darkening the image.
If bright red walls reflect red light onto your screen, you may compensate by adding too much green to your image. I like to edit in a dark room at night, so I consistently edit my pictures in the same lighting conditions.
If editing at night does not suit your lifestyle, invest in some nice thick curtains or blackout blinds so you can get your room nice and dark, consistency is the key.
5: CUT OUT THE DISTRACTIONS
I always try to edit an entire session from start to finish in one go. It means that all of the images in that gallery will look much the same. When I edit at night, the kids are in bed, and there are fewer distractions.
I switch off social media and close down my email.
My headphones and 80’s playlist come out, and I get the gallery edited within a couple of hours instead of a whole day!
6: ...AND ACTION!
Use Photoshop actions to speed up your workflow.
With newborn babies, we encounter the same challenges over and over again.
A Photoshop action is a recorded series of steps used to correct a specific problem. This sequence of steps can then be reapplied to another image by simply clicking a button.
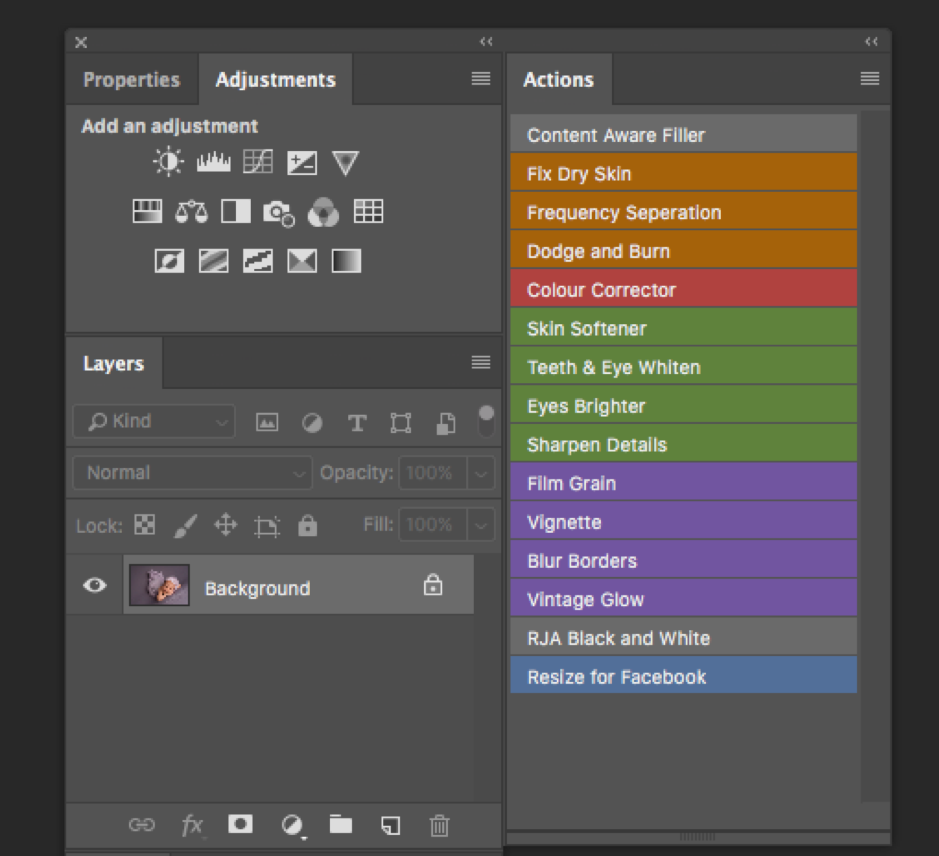
You can’t rely entirely on Photoshop actions, but they help reduce the time you spend in front of the computer.
Buy a Photoshop action set that is specific for newborn baby retouching. These actions will address the usual problems we face when editing newborn skin.
7: 16-BIT VS 8-BIT (RAW vs JPEG)
I will keep this short at the risk of getting too technical; It is important though!
A 16 Bit image (RAW, TIFF and PSD) has infinitely more separate colours than an 8 Bit image (Jpeg) image. The human eye (or our screens) can't see the difference at face value, so why does it matter?
It comes down to editing, particularly when applying filters such as gradients and vignettes.
When applying a vignette to an 8-bit image, we encounter a common problem known as "banding”.
"Banding" happens when Photoshop can no longer display smooth transitions from one colour to another. Instead, you get an ugly stair-stepping effect between the colours.
When applying a vignette to a full 16-bit image, these steps are dramatically reduced, and we have a smoother transition between the colours and tonal ranges.
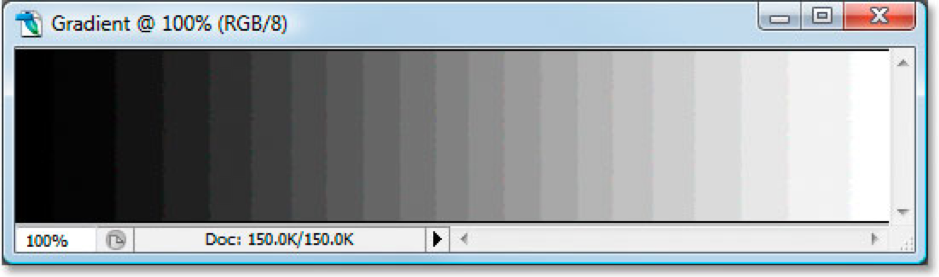
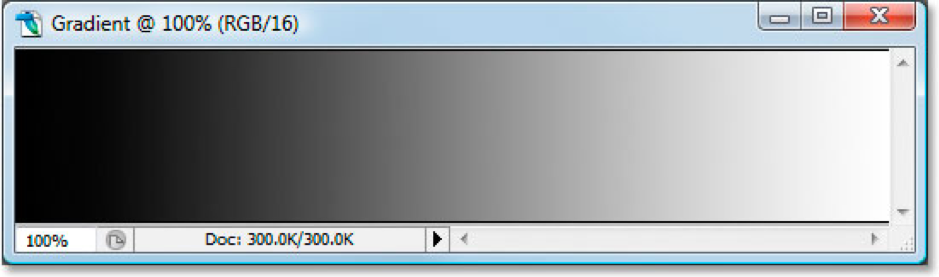
Shoot your photos in the RAW format and then edit them in Photoshop as a 16-bit image. Keep in mind, though, that when working with 16-bit images, the file size is much larger than you'd have with an 8-bit image, and if you have an older computer, it could impact how long it takes you to work in Photoshop.
Save your 16-bit version as a Photoshop .PSD file and then save a separate 8-bit JPEG version in a separate folder which can be used for printing.
8: DON'T OVERDO IT
We can easily over-retouch a baby’s skin. Nothing is worse than a plastic-looking baby that looks more like a children’s doll. Our customers are paying us for beautiful pictures of their babies, and we have a professional and moral obligation to supply them with just that.
For instance, it is not hard to accidentally change the complexion of a baby; some nationalities have more yellow hues in the skin, which can easily be mistaken for jaundice. I always do a quick before and after comparison before I save a retouched image to ensure I have not overdone it!
Remember, babies are beautiful just the way they are. When retouching, we just need remove the temporary blemishes that will pass after a few weeks.
Just because you can doesn’t mean you should.
I go into much more detail and demonstrate my editing workflow in my ‘Editing for Newborn Photography’ Course.
All the best
-Russ
- Join The Russ Jackson Academy Facebook group and network with new and experienced family portrait and newborn photographers
- Access my FREE video course module: The Comprehensive guide to lighting gear for newborn photographers
